
Tuesday, May 4, 2010
Tip: Yes you can change aperture when using Art Filters !
I have noticed a number of complaints on the Internets regarding changing aperture when using Art Filters. Because Art Filters are only accessible using the command dial and the command dial is the only way to enter aperture or shutter priority modes, the assumption has been that there is no way to change aperture. I am huge fan of the pin-hole art filter, so much so that 80% of my pictures are taken using this effect. Since acquiring the Olympus 17mm pancake, I have been doing quite a bit of wide-open shooting @ f2.8 which means my beloved Pin-Hole Art Filter has been left behind for the rather mundane Aperture Priority mode. The other day by accident I noticed that I could cycle through a variety of aperture and shutter combination's as if I was in Programmed Auto Mode (P) allowing me to select f2.8 when using an Art Filter. I was able to cycle through the aperture/shutter combinations by using the vertical command dial on the back of the EP-1 and now my beloved Art-Filters are once again my default weapon of choice.


Thursday, April 22, 2010
Making the Switch: DSLR to m4/3rds

I have seen a growing number of threads on photography forums with same question in mind: Should I do it ? Should I make the switch ? A number of people, like myself, have made the switch while others have clearly stated that they would never give up their DSLR. In effort to provide more food for thought I have decided to write about my story in "Making the Switch'".
Before I begin I want to preface this story by stating that you can always switch back. Some of the forum posts seem to be from people who are agonizing over this decision and yet they fail to realize that nothing is permanent, nothing is written in stone. If you do decide to switch from one format to the other you can always sell and reacquire what you had (or upgrade to something more desirable).
Before I begin I want to preface this story by stating that you can always switch back. Some of the forum posts seem to be from people who are agonizing over this decision and yet they fail to realize that nothing is permanent, nothing is written in stone. If you do decide to switch from one format to the other you can always sell and reacquire what you had (or upgrade to something more desirable).
As someone who has owned a few DSLRs over the years: Nikon D50, D200, and Rebel XSI I can tell you one important lesson I have learned: The camera is simply a tool limited only by your imagination. Regardless of brand, model, and design - a camera is (to a certain degree) a camera. Of course your requirements as a shooter truly define what your needs are, but most modern digital cameras have the same basic features. The key reason I purchased my first DSLR was image quality. I wanted noise free, high dynamic range, color accurate, detailed images - something I could not get from point and shoot camera - and something you could only get from an SLR. The migration from a point-n-shoot camera to an SLR was truly a wonderful and rewarding experience though at the same time was also my Achilles Heal. You see with SLR ownership came GAS or Gear Acquisition Syndrome. I needed more lenses, more flashes, tripods, bags and bags for my bags, etc. After a while, the Gear Acquisition Syndrome that comes with DSLR ownership somehow became Gear Burden Syndrome. So to countermeasure the GBS, I begin shooting my D200 with small primes. At first I felt as though I was somehow limiting my capabilities as a photographer running around with nothing but a 28mm prime attached, but I never seemed to miss a shot - it was challenging, yet rewarding and put a little passion back into the process.. The D200 with a small prime attached left me wanting more (or I suppose less would be the more accurate word here) so I switched from the D200 to a Rebel XSI. Yes of course that seems to be an odd migration moving from a Pro body to a Consumer, but my reasoning was quite simple: I wasn't using the D200 for everything it had to to offer: Was I shooting Birds in Flight ? No. Was I shooting sports ? No. Was I shooting in the rain ? No. 90% of the time I was using the D200 with my own no-fills recipe: aperture priority - center point auto-focus, and matrix metering. After a while I reasoned that I could do the same with a Rebel XSI and have a more compact body in the process. Yet even with the purchase of the Rebel I still found myself leaving the camera behind. It was still something I had to worry about, something I had to lug around and something that drew unwelcome attention at times. - it was still an SLR. Then the Olympus EP-1 Pen came onto the market. It was the perfect compromise between an SLR and a point-n-shoot camera. Interchangeable Lenses: Check. SLR image quality: Check. Compact Size: Check. Of course the Pen is by no means perfect The grip isn't as comfortable, no viewfinder, slower performance, limited lens selection, and so on. I honestly begin wondering at first if I had made the right decision, after-all on paper the Pen was no SLR. And then in a moment of clarity I stopped thinking about what I gave up, started taking pictures and realized what I had gained. Taking pictures was no longer a burden. No bags, no bulky bodies, no protruding lenses. No pain around my neck, no unwelcome attention. As Mel Gibson put it best in that movie I can't seem to remember: 'Freeeeeee-dom". I could take pictures and leave all of my worries behind me. Even better the Olympus JPEGs were so good that I could even finally retire RAW which went from being the ultimate control freaks best friend to an often exhausting , repetitive process.
So am I telling you to "Make the Switch". No. I am simply sharing My Story. Now please share your own.
Thursday, April 15, 2010
Olympus Promises Faster Auto-Focus via Firmware Update
Auto Focus Performance
This update will improve camera AF performance when shooting both stills and videos with the E-P1, E-P2 and E-PL1 cameras when using any Micro Four Thirds or Four Thirds lens. Auto Focus Lock time when shooting stills is improved by 15%. Auto Focus tracking accuracy when shooting movies is also improved.
Viewfinder/LCD Simultaneous Playback Function
This upgrade also brings additional display functionality to the E-P2 and E-PL1 cameras when fitted with the VF-2 Electronic Viewfinder. Photographers using these combinations can now view menu and recorded images on the LCD while the VF-2 Electronic Viewfinder is in use.
Movie-Still-Compatible (MSC) Lens Compatibility
This update also ensures that like the E-PL1, the E-P1 and E-P2 camera models are fully compatible with and able to take advantage of two recently announced and soon-to-reach market lenses; the M. Zuiko Digital™ ED 9–18mm F4.0–5.6 and M. Zuiko Digital ED 14–150mm F4.0–5.6 lenses. Olympus is designating these two lenses as MSC, or Movie-Still-Compatible. They are optimized for shooting high definition video with accurate and silent autofocus.
The new firmware will be available on April 22, 2010.
This update will improve camera AF performance when shooting both stills and videos with the E-P1, E-P2 and E-PL1 cameras when using any Micro Four Thirds or Four Thirds lens. Auto Focus Lock time when shooting stills is improved by 15%. Auto Focus tracking accuracy when shooting movies is also improved.
Viewfinder/LCD Simultaneous Playback Function
This upgrade also brings additional display functionality to the E-P2 and E-PL1 cameras when fitted with the VF-2 Electronic Viewfinder. Photographers using these combinations can now view menu and recorded images on the LCD while the VF-2 Electronic Viewfinder is in use.
Movie-Still-Compatible (MSC) Lens Compatibility
This update also ensures that like the E-PL1, the E-P1 and E-P2 camera models are fully compatible with and able to take advantage of two recently announced and soon-to-reach market lenses; the M. Zuiko Digital™ ED 9–18mm F4.0–5.6 and M. Zuiko Digital ED 14–150mm F4.0–5.6 lenses. Olympus is designating these two lenses as MSC, or Movie-Still-Compatible. They are optimized for shooting high definition video with accurate and silent autofocus.
The new firmware will be available on April 22, 2010.
Tuesday, April 6, 2010
The Olympus 17mm 2.8 Review

The Olympus 17 2.8 was announced around the same time as the EP-1. Ever since it was announced the lens has faced quite a bit of scrutiny from users on the web. Even some reviews were rather ho-hum about this optic, and of course once the Panasonic 20 1.7 came onto market, it almost seemed to fade into the shadows. Truth be told I purchased this lens for two reasons: 1) The price was hard to resist and 2) The lenses profile and design are a perfect match to the EP-1. I did of course consider the Panasonic, but I honestly have trouble with the price of this lens which is almost as expensive as the camera body itself and my good friend, author, and professional photographer John Biggs stated that the Panasonic had two notable cons which concerned me: 1) Size - with lens cap in place the Panasonic is almost as thick as the kit lens and 2) Focusing - the Panasonic seems to focus a bit slower on the Olympus body. That being said I am not here to contest the two lenses against one another, only provide a subjective review of the 17mm 2.8 itself.
 |
Design / Build
The Olympus 17 2.8 is quite small and extremely light with the profile only protruding roughly an inch from the camera body. The lens itself is a mixture of metal and high quality plastics all of which feels a bit better in hand than most 50mm 1.8 primes I have used. The focusing ring is well dampened and quite smooth though it should be noted that the focusing ring is by-wire and not truly mechanical, nevertheless in practice manual focus was actually quite a pleasurable experience.
 |
Focusing
Thought not scientific, one thing that I took notice of immediately when using this lens indoors was the speed of focus which seemed by all accounts to be significantly faster than that of the Olympus 14-42 kit lens. Focus acquisition was about as quick as I could press the shutter (center point engaged) which was a welcome delight considering that the EP-1 does in fact seem a bit slower at times than an SLR
Image Quality
I expected the image quality of the lens to be somewhat lackluster after reading several reviews and forum postings on the web all of which had me thinking that this lens was average at best. I suppose the lesson learned here is that one should always take information on the web with a grain of salt as my own findings revealed that the Olympus 17 2.8 was an all-around solid performer. Wide-open @ f2.8 the IQ is stunning from this little gem. Sharpness, color, and micro-contrast are superb. No pixel peeping was necessary to see that this lens is optically superior to that of 14-42 kit (and I do consider the 14-42 to be a very good lens). Out of focus rendition is quite appealing with a very smooth background rendition achievable at fast apertures which is something of an unusual trait that is typically not found in wide-angle lenses, but a welcome bonus nevertheless.
Conclusion
The Olympus 17mm 2.8 should in fact be on your short list, especially now that the price has dropped to below $250 (U.S. Dollars). You do give up the convenience of a zoom in the acquisition of a prime, but at the same time you maximize the IQ potential of the camera which for me is welcome trade-off. The lens is such a good performer that I am actually debating selling the 14-42 kit, a lens which I have raved about in the past. Probably the only notable con is the speed of the lens itself with 2.8 looking a bit slow for a prime, though in all fairness we should consider that most 35mm primes are typically no faster than f/2 (save exotics like the Canon 35 f1.4 L, but this lens also costs 5x more) and most likely the speed limitation is by design, after-all remember the Olympus 17mm is a pancake lens (silver dollar edition no doubt).
So in summary what does one get for $230 ?
- Portable Size and Weight.
- Fast and Accurate Focus Acquisition.
- Attractive & Well Executed Design matched to the Pen's retro looks and styling.
- Constant 2.8 Aperture.
- Excellent image quality (even wide-open), a step-above the Olympus 14-42 kit lens.
- Delicious Bokeh - did I just say delicious ?
Samples - Out of Camera JPEGs

Bokeh Test (Click For Larger Sample). Look closely at the texture and detail on the plug itself.

Detail Test - Wide-Open (Click For Larger Sample). Amazing level of detail and texture on the torch.

Bokeh Test -Wide-Open (Click For Larger Sample)

Detail Test - Wide-Open (Click For Larger Sample). Examine the level of detail in the Subject's Eye.

Wide-Open Bokehlicious


Friday, April 2, 2010
Completing The Look - Part I
 |
If there is one thing that the Pen (or Micro 4/3rds format in general) has resurrected, it's the old school film-era style of photography. When I say 'style' I mean a number of things: Fashion, Lens Choices, and Post Processing. Yes, this is a fad, but it's a good one, one that can teach us a few things in a world lost to automatic technology. So what does one need to 'Complete The Look' and become a true old-school photographer ? Well in the next few weeks I will be talking about everything from fashion, to technique in a series dedicated to bridging the analog & digital divide.
Today I'd like to talk about fashion in relation to photography. Why fashion ? I mean really who cares about the look of the camera ? Well I for one think it does matter, even if the effect is more or less psychological. Our digital cameras are designed to be perfect, automatic, no work required, color output machines. As much as I embrace the technology that goes in digital, one can't help but to feel a bit 'tired' of the cookie cutter look of SLRs and the feeling that once you own one cliche 'soccer mom' pictures of the kids running around and flowers in the backyard are the only things that seem to come natural. Yes, I know I am being a little sarcastic here, but truth be told sometimes the device in hand does in fact become an extension of our perspective. One can't help but to shoot black and white with a Pen, but why is that ? You can shoot black and white pictures with just about any camera, but the Pen seems to provoke the interest a bit more. It's the design and style that plays a role here and regardless of how you attempt to deny it, it works. Put an all magnesium weather sealed Nikon D3 in one's hand and watch what happens: the camera inspires confidence. People assume as it's a pro camera it will auto-magically make them a pro. Now put a cheap, disposable camera in hand - where is the confidence now ? Yes, I know we are comparing apples to oranges here, but keep in mind that we are not comparing specifications, were comparing the look and feel of the machines in hand.
So if you really want to go all out and complete the look of your Pen, here are some suggestions:
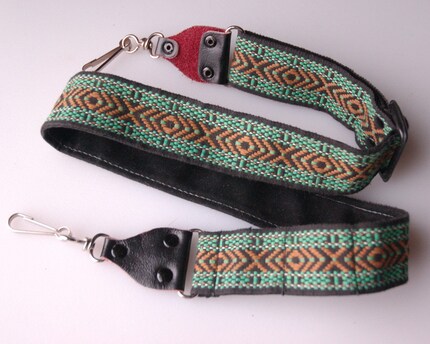
Get an Vintage Camera Strap. These straps also known as 'Hippie' camera straps are all over ebay and tend to be dirt cheap. There wide with a velvety finish and actually feel very nice around the neck all the while giving the camera a very era specific look.
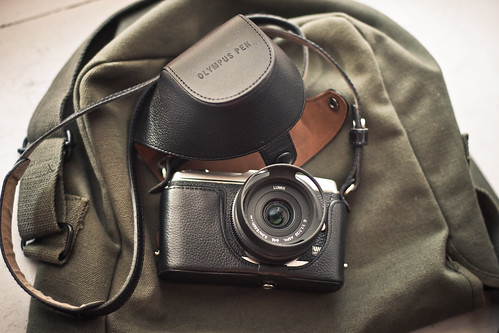
Ebay ( Leather Cases )
Purchase a leather case (or for a truly retro look, go for a half-case as shown above). Not only does it look good, feel good, and smell good - but it also protects your investment.

Apply a skin to your camera's body. Again not only does it 'complete the look', but it also helps protect the body. Skins are in everything from leather to wood grain as shown above.
Any more tips for "Completing The Look", please share in our comments section.
Saturday, March 13, 2010
Life's Precious Moments
The Pen being a small and unobtrusive camera was welcome in a setting such as a veterinary clinic because of it's point-n-shoot looks. Yet in this setting, under less than ideal lighting I was able to capture the magic of a dog's emotional first visit to the vet due to the Pen's phenomenal high ISO performance and in-body stabilization - this in itself is a testimate not only to the camera's capabilities, but it's ability to go anywhere and everywhere life's precious moments may be waiting to be captured.


14-42 Kit Lens. ISO 800-1600. Out of Camera JPEG. Pin-Hole Art Filter.
Thursday, March 11, 2010
Lens Choices For Your Pen
It's a heavily talked about topic on forums: what lens should you get for your new Pen ? The answer unfortunately is not a simple one. If you are like me and spend time trolling (no pun intended) through the forums, you probably see a re-ocurring theme of 'Purchase the Panasonic 20mm prime'. So is it that simple ?
To start, I am going to say something that will shock and awe you, something most people won't admit too, but as a long time photographer I plan to enlighten you with: Most lenses have good optics. Computer aided engineering, advances in optical technology, coatings, etc - you name it, "it's in there" - even in the inexpensive kit lenses. What does this mean ? Well quite simply it means that the inexpensive kit lens that comes with your Pen is going to be sharp, contrasty, and colorful. Reviewers and critics will attempt to find flaws, and on paper these flaws are in fact reproducible, but in the field you'll most likely never see them. So putting charts and graphs aside and equalizing the playing field in terms of the quality of the optics, how do we compare these two lenses ? We compare them in terms of their usability, a factor that at the end of day goes a lot farther in making a sound decision than attempting to figure out which one has the higher MTF number !
So why should I choose the Panasonic 20 1.7 over the Olympus 14-42 kit lens ?
-
It's compact. Much more so that the Olympus kit.While the pen cameras are in most cases more desirable to carry around than an SLR, the protruding kit lens is still a buzz kill for those seeking a truly 'pockatable' option. - It's fast. The 1.7 aperture + Olympus IBS (In body stabilzation) + Olympus high ISO performance equals a very confident 'no flash required' machine.
So why should I choose the Olympus 14-42 kit lens over the 20 1.7 ?
- It's cheaper. The 20 1.7 is a very expensive lens considering at the end of the day it pretty much is the standard fair 35mm 50 1.8 (ok 40 1.7, but u get the drift) which go for around $100. You pay a premium for the lack of competition in the 4/3rds marketplace.
- It's more flexible. A zoom is always more flexible that a prime. 28-84mm is a very good working range that should satisfy most day-to-day requirements.
So what is best choice ? Get Both. I think the 14-42 is a great lens, and really should be your first choice. It's cheap, offers a nice range and to taking a quote from Steve Job's "It Just Works". The 20 1.7 is more specialized and should be considered as a second addition to the family (especially so if you require a faster aperture and/or looking to minimize the footprint of your Pen as much as possible). I myself patiently await more 4/3rds primes !
Wednesday, March 10, 2010
Photographer's Block
It happens to all of us now and again, we tire of the subject matter we are shooting. The cliche' flower and landscape just loose their substance after a while. The problem isn't the subject matter, it's the perspective of the photographer.
It's a problem that everyone suffers from and the issue is deeply rooted in the influences around us. We grow up thinking that the best pictures are those of vivid mountainous landscapes, a winding river, a glowing sunset or a garden full of colorful flowers. The problem is we all don't have the luxury of having those national geographic 'esq subjects in our backyards and even when we do like everything else the interest fades after a while.
Perspective is key in solving 'Photographer's Block', our limitations are bound only by our imagination, not by the subject matter than stands before us. For instance, we may take a stroll downtown through a city and take pictures of buildings, monuments, etc. After a while we become bored with the location after all buildings and the like don't change very often. So how do we bring fresh subject matter to a location that doesn't change ? We change perspective: A Building shot in color, is now shot in black and white. Instead of shooting the building as a whole we instead shoot the windows, the door, or the sign hanging above. We shoot from the round looking up, from the side, or an angle. We shoot a patron smoking right outside the door, or slow down our shutter to capture the movement of traffic in the street. We change, because sometimes our subjects do not.
Every time we visit a place, we need to look at things with a fresh perspective. Our eyes and mind are programmed to look at things as a whole complete product, but it's the little things that truly make great subject matter. When we focus in on a subject, we draw attention to it, we compel the audience and sometimes we tell a story. When our subject is too complex, we sometime loose our audience to the visual overload being presented. Do yourself a favor the next time you visit your proven, but worn hunting grounds - look at things you didn't look at before, attempt to shoot things that you would normally pass by - you will not only overcome 'Photographer's Block', but you will also become a better photographer.
Tuesday, March 9, 2010


Monday, March 8, 2010

Monday, February 8, 2010
No Flash Required
It's probably the biggest complaint I have read about on forums: the EP-1's lack of internal flash. For some people (especially those migrating from a P&S), flash is a critical element of the camera. For me, the lack of an internal flash turned out to be a blessing in disguise. Learning to use the camera under natural lighting conditions and taking full advantage of the respected high ISO performance of the EP-1 has allowed me to produce some of my best work to date.
No Flash Required ( Tips & Tricks )- With still subject matter, the EP-1 has built in stabilization to help combat the effects of camera shake. Use this to your advantage. I have hand-held shots as low as 1/16 of a second using IBS.
- If you need more shutter speed, raise ISO. The EP-1 has a maximum ISO of 6400.
- If ISO 6400 doesn't cut it, you can 'push' the camera ISO. Just dial in a exposure compensation of +1 (or higher) EV. Pushing the ISO will generate more noise, but the look is perfect for B&W.
- Select Continuous Mode. The EP-1 has a burst rate of 3 FPS, giving you a higher probability of a sharp picture.
Wednesday, January 27, 2010
Dramatic Black and White In Camera
Want a very dramatic black and white picture straight out of your pen ? Want a touch of contrast and some soft vignetting ? Well the formula is quite simple: shoot in color using the PinHole Art Filter and then convert in-camera (using the JPEG editing features) to black and white. The camera of course makes a copy of the original during the black and white conversion process so you'll have both in the event you find yourself indecisive with the desired effect. The Pinhole + Black and White, in my honest opinion, is nothing short of gorgeous.

Before Black and White Conversion

After Converting to Black and White in camera.
The above picture was actually a candid of my wife as she sit waiting in the living room - she looked up and I snagged a quick shot under some rather poor, incandescent lighting. ISO 1600 f 5.2 36mm. Studio In a Box ? Of course, no flash is necessary with the pen.
Tuesday, January 26, 2010
The "Bleached" Pin Hole Effect
I have been a huge Photoshop fan since it's inception, which is why it's very bittersweet for me to state that the Pen has made me Photoshop free. Many of many favorite effects and processing tools are built right into the camera so why should I spend the added time in the digital darkroom when I can spend more time in the field shooting ? To demonstrate the depth of Photoshop-free effects achievable with this camera I will continue to enlighten my blog audience (crickets !) with tips and tricks that provide those ever-popular and fashionable looks people are searching for.
The Pin Hole filter is one of my favorite all-time effects and with a little tweaking you will find that this is not simply a static filter, but one that can be changed to your liking by modifying other camera parameters. Today's topic: The Bleached Pin Hole Effect. The Bleached Pin Hole Effect is very simple formula: Pin Hole Art Filter + Overexposure. That's it, nothing more, nothing less. I recommend as a starting point a roughly +1 stop of exposure, but of course tweak to your liking.

Exposure pushed +1.3 EV
I think this look is somewhat reminiscent of the film era Bleach Bypass effect. I see wedding photographers adding this effect to their portfolio all the time, of course they have sit behind a desk and process each image to achieve this look, us pen owners are fortunate enough to have it built right into the camera.
Wednesday, January 13, 2010
Firmware 1.2 released for the Olympus EP-1
Quoted from dpreview.com
Olympus has released a firmware update for its E-P1 Micro Four Thirds camera. Version 1.2 changes the duration of the enlarged MF Assist view, 'to improve operability'. It also changes the camera's behavior when the screen backlight is turned off. The updates improve the autofocus operation of both the lenses. Firmware updates can be downloaded via the Olympus Master/Studio software
Friday, January 8, 2010
Art Filters: Grainy B&W
Olympus has some very impressive controls for creating black and white images. You can change contrast and sharpness, select from a number of black and white filters, add a touch of noise, color toning, and even a bit of vignetting, all without ever leaving the camera - truly impressive stuff.
The Pen has several 'Art Filters' built into it's in-camera processing arsenal. Last week we discussed the Pin Hole Art Filter, one of my all-time favorite effects. Today I would like to talk about the Grainy B&W Art Filter. The Grainy B&W filter, as the name implies, produces a rather coarse, contrasty, edgy 'journalistic' look. It might sound a bit rough from the description and truth be told this is one of those most destructive filters I have ever used, that being said the end-result is rather satisfying as it invokes a dramatic response from each image.


Thursday, December 31, 2009
Art Filters: The Pin Hole Effect
Art Filters are one of those things that I typically disregard on a camera. Let's face it, art filters or 'in-camera effects' are typically pretty nasty looking (I still have never understood the Solarize Effect that Sony put on all of it's cameras years ago to be honest with you). That being said, the Olympus EP-1 has some very usable and likable art filters in it's arsenal. In fact there are several Art Filters which I use quite often, including the one I am going to discuss today: The Pin Hole Effect.
Wednesday, December 30, 2009
B&W Moments
All of these pictures are straight out-of-camera JPEGs with no post processing provided. Pin-Hole Art Filter. Natural indoor lighting. Lens: Olympus 14-42 m.Zuiko.

F4.9 1/60s ISO 1600
Free RAW Converter: UFRaw
I just made my case the other day for why I shoot exclusively with JPEG using the EP-1, but that doesn't mean I am disregarding the RAW format altogether. RAW is a highly respected and widely used format amongst many digital darkroom aficionados.
UFRaw has been around a long time. It's an open source project based on the dcraw conversion utility. The converter itself is fairly straight forward in use and provides a plethora of controls, though some important items such as sharpening are in fact missing. UFRaw is also a cross-platform application in that it can be used on Mac, Windows, and Linux platforms.
http://ufraw.sourceforge.net/
UFRaw has been around a long time. It's an open source project based on the dcraw conversion utility. The converter itself is fairly straight forward in use and provides a plethora of controls, though some important items such as sharpening are in fact missing. UFRaw is also a cross-platform application in that it can be used on Mac, Windows, and Linux platforms.
http://ufraw.sourceforge.net/
Craving More EP-1 ? Check out the Forums @ E-P1.NET
Want to discuss the EP-1 with like minded individuals ? Do you love talking about lenses and accessories or enjoy showcasing your work ? Then look no more, the E-P1 forums is where you will find this and more...
Tuesday, December 29, 2009
Save Space: Skip the Super Fine JPEG Setting
I understand that we are in fact living in an age in which storage space is rather cheap, but that doesn't excuse us from waisting space simply for the sake of doing so.
Respected Dpreview author/reviewer Andy Westlake made the following comments on a dpreview thread several months back in regards to the Olympus Super Fine JPEG setting on the EP-1:
Once you've found where Olympus hid SF compression, I'd strongly advise you take a load of shots at both levels and look at them extremely closely. Then, when you've satisfied yourself there's no visible advantage to using SF, you can set the camera back to Fine and stop wasting your card space.
Seriously, there comes a point where decreasing the JPEG compression level is pointless, it just gives larger files. For example Photoshop allows settings of 1 - 12 for quality, but most experts will tell you there's little point going above 10. Olympus's SF JPEGs are considerably larger than Photoshop's set to 12.
You can read the full thread @ dpreview.com: http://forums.dpreview.com/forums/read.asp?forum=1041&message=33357575
Subscribe to:
Posts (Atom)